How to reinstall Windows 11Updated 4 months ago
There are a few different ways to install or reinstall Windows 11, and the method you use depends on what you’re trying to do or maybe the state your PC is in. In this guide, we’ll go over the most common options, from using the built-in Windows Reset method, Windows Advanced Repair, the Media Creation tool (USB drive), and other and recovery tools.
Each section explains when that option makes the most sense and walks you through the steps so you can get Windows 11 up and running again.
⚠️WARNING: Reinstalling Windows will erase your files and applications. Please backup any important data before continuing. META PC is not responsible for data loss including but not limited to personal files, applications, configuration settings, pictures, videos, or the Epstein Files.
IF YOUR PC BOOTS INTO WINDOWS
WINDOWS RESET METHOD
Best used when: Your system still loads into Windows but you’re running into problems, or you want to start fresh without creating a USB drive.
- Backup any files, documents, pictures, etc., that you do not want to lose
- Open up the start menu, type "reset", select Reset this PC, then under Recovery options, select Reset PC
- Follow the prompts to reset the OS. Most often, we recommend starting fresh and deleting all user data
- PLEASE NOTE THE ABOVE RECOMMENDED METHOD REMOVES ALL PROGRAMS, FILES, PICTURES, VIDEOS, AND USER DATA FROM ALL ACCOUNTS
- When prompted to use a Cloud installation or a Local installation, you may choose either option. A cloud installation will download the latest Windows Updates onto your machine during the installation process. A local installation will solely install the revision of Windows that was installed onto the drive.
- Once Windows is installed, be sure to install the latest motherboard and graphics card drivers, as well as the latest Windows updates for your system (see bottom of this article)
IF YOUR PC DOES NOT BOOT INTO WINDOWS
WINDOWS RECOVERY ENVIRONMENT
Best used when: Windows won’t start normally, and you want to try built-in recovery and reinstall options before creating external media.
- Turn on the computer
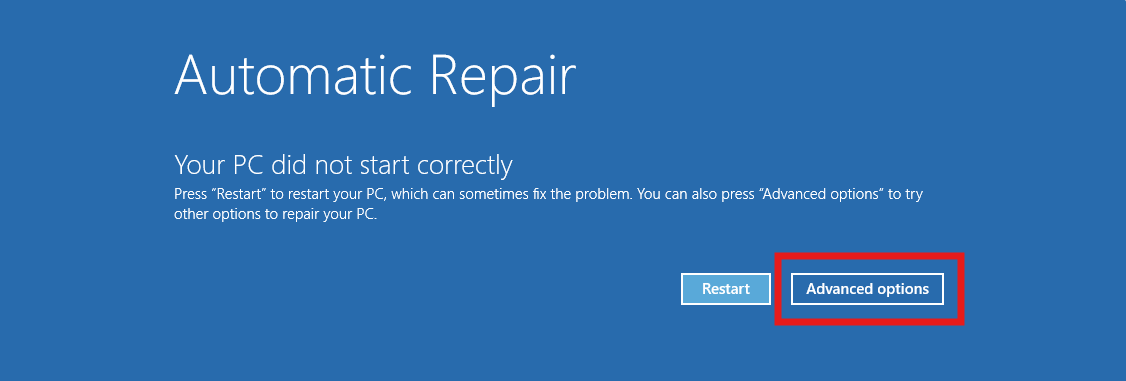
- When you see the Windows loading screen with the circle moving around, press and hold the power button to shut down the device, or flip the switch on the back of your power supply to cut the power to your system
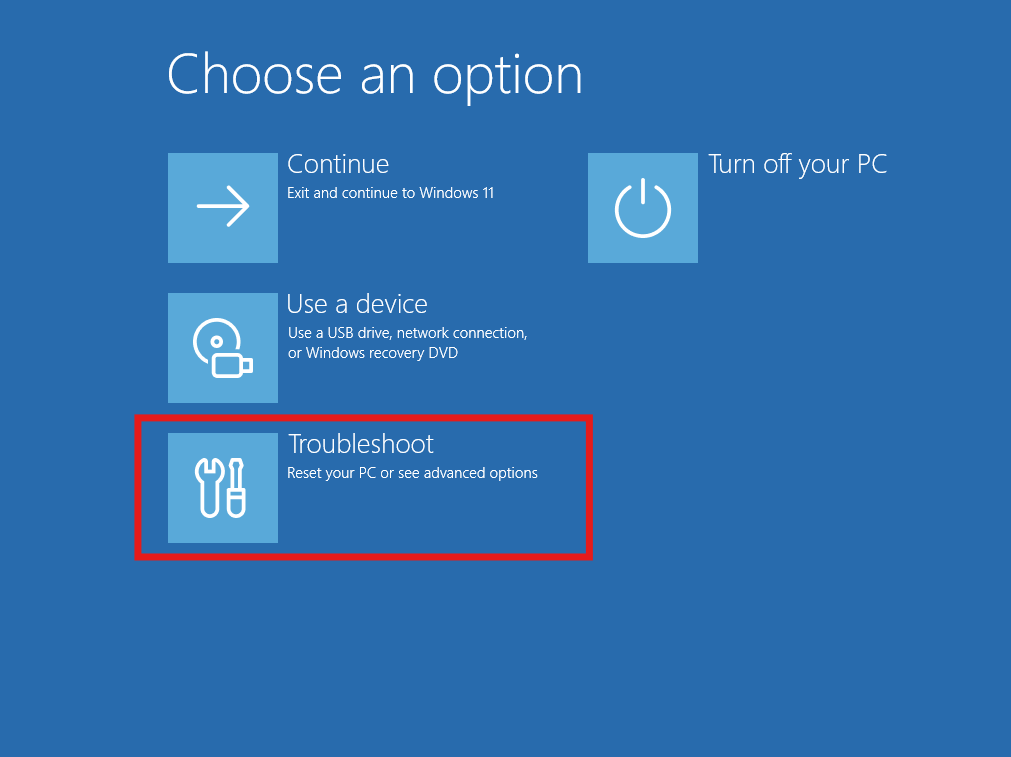
- Repeat the above steps two more times. On the third restart your system will enter the Windows Recovery Environment (Windows RE or WinRE) and Advanced Options are displayed (see image below)
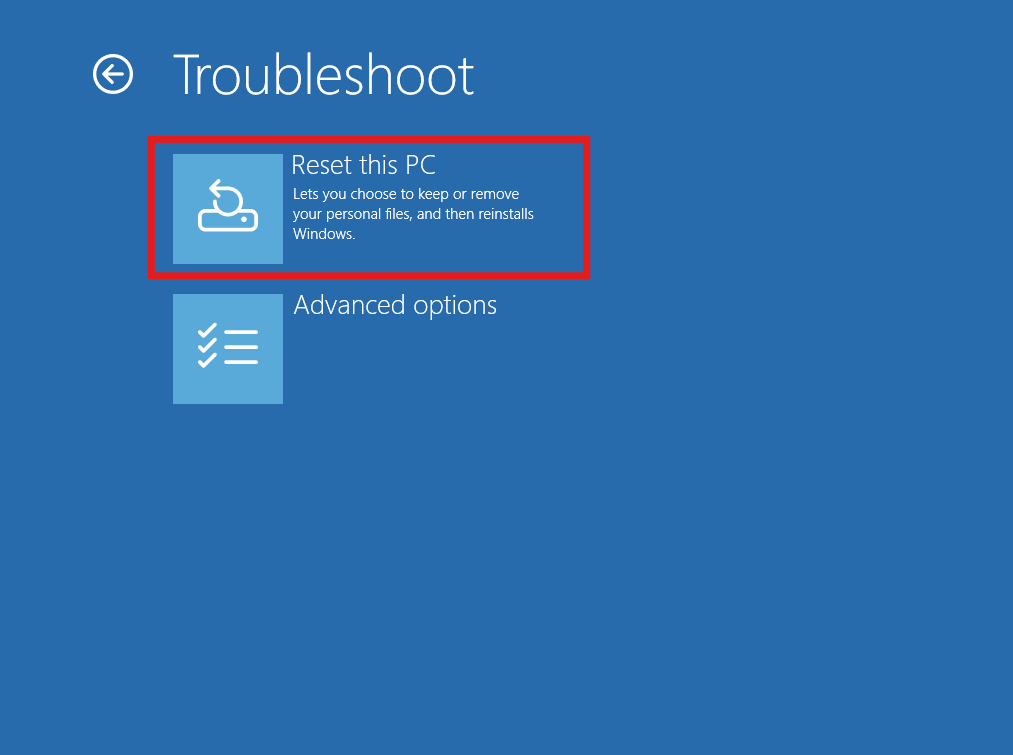
- Select Advanced Options, then Troubleshoot, then Reset this PC
- When prompted to use a Cloud installation or a Local installation, you may choose either option. A cloud installation will download the latest windows updates onto your machine during the installation process. A local installation will solely install the revision of Windows that was installed onto the drive.
- Once Windows is installed, be sure to install the latest motherboard and graphics card drivers, as well as the latest Windows updates for your system (see bottom of this article)
WINDOWS USB MEDIA CREATION TOOL
Best used when: You need a completely clean install, are replacing a drive, or recovery options aren’t working. This requires another computer to create the USB drive.
REQUIREMENTS
- A PC with a reliable internet connection
- A blank USB flash drive with at least 8 GB of space
- A Windows product key (this should be on the back of your PC, or bottom of your laptop) --
- Take note of which version of Windows the key is for (i.e. Windows 11 Home or Windows 11 Pro) -- we recommend taking a photo on your phone to reference they product key later.
STEP ONE: CREATE THE USB FLASH DRIVE
- Plug the USB flash drive into your system
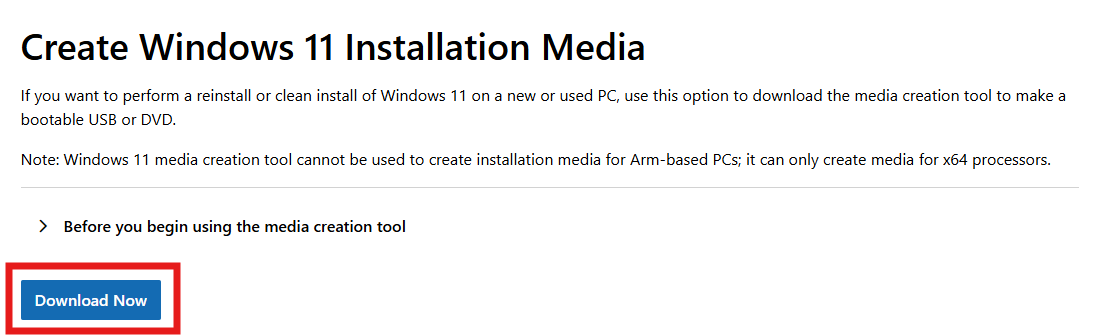
- Go to the Windows Media Creation Tool website
- Under the Create Windows 11 Installation Media section, select Download Now. The MediaCreationTool.exe will download
- Run MediaCreationTool.exe -- the tool walks you through the creation of the installation media. Select the USB flash drive we plugged in earlier for the installation destination.
⚠️WARNING: ANY DATA OR FILES ON THE USB FLASH DRIVE WILL BE FORMATTED AND LOST DURING THIS PROCESS
 Screenshot taken from the Media Creation Tool website
STEP TWO: INSTALL WINDOWS USING THE USB DRIVE
- Remove everything except the keyboard and mouse from the PC
- Ensure the USB drive is plugged into a USB port
- go into BIOS by tapping DEL on your keyboard as the PC is booting up
- Go into advanced mode and go to the boot section
- Find your USB and select it to boot from it (You may have to make the USB device as boot option #1)
- The process should begin for the Windows install
- Select your language to install, region, etc..
- Enter the product key on the back of your PC (we recommend taking a photo on your phone to reference they product key later)
- When prompted, select the correct version of Windows that matches your Product Key (i.e., Windows 11 Home, Windows 11 Pro) otherwise your product key will not work and you will need to reinstall Windows again!
- When asked what disk to install Windows to, delete all partitions on Disk 0 that aren't listed as Unallocated Space. Partitions are deleted by selecting and highlighting each one individually and then selecting ❌Delete Partition
- Once all partitions on Disk 0 are deleted, there should only be one item left called Disk 0 Unallocated Space. Make sure Disk 0 Unallocated Space is selected and highlighted, and then select Next
- In the Ready to install window, select Install
- The Windows install will begin. The PC will restart several times during the reinstallation
- Once Windows finishes installing, step through the Windows configuration wizard and configure settings as desired.
- Now that Windows is installed, be sure to install the latest motherboard and graphics card drivers, as well as the latest Windows updates for your system (see bottom of this article)
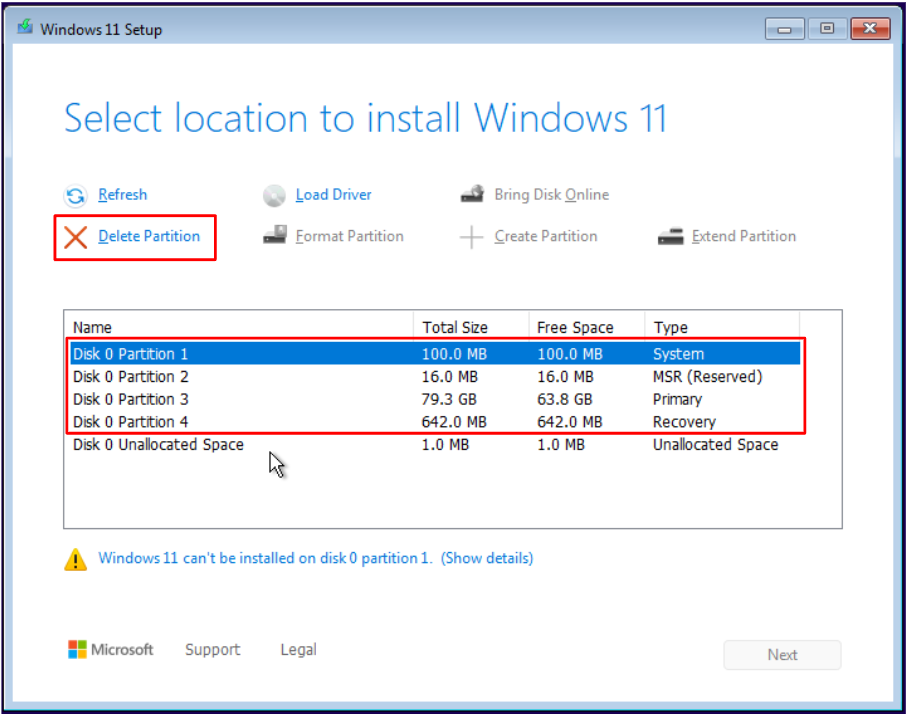 Example of Disk 0 partitions that should be deleted to Unallocated Space, to then install Windows on
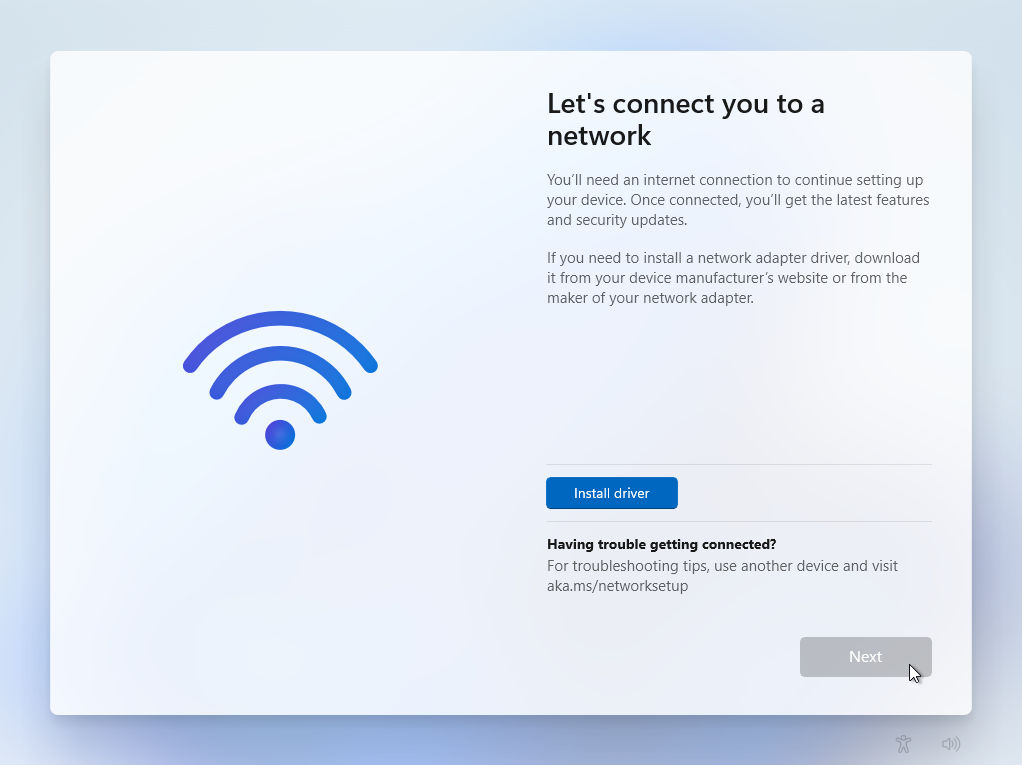
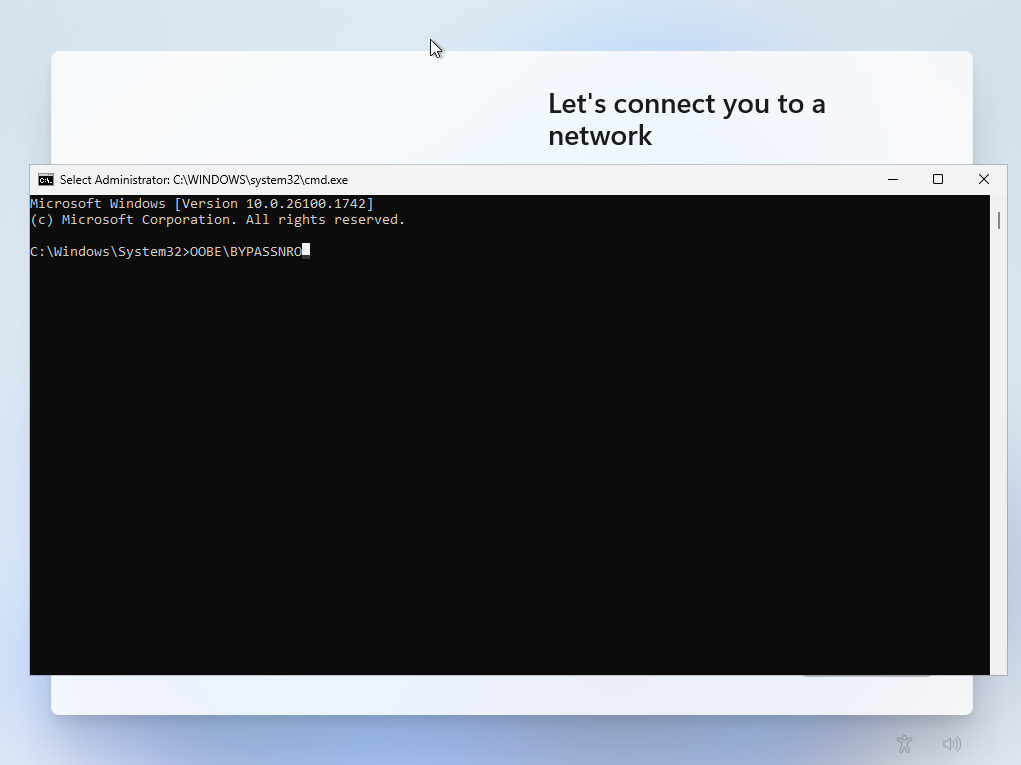
IF YOU CANNOT CONNECT TO A NETWORK DURING SETUP
Some users may get stuck on the “Let’s connect you to a network” screen. If this happens to you, don't worry, there's an easy fix!
- Press Shift + F10 to open Command Prompt
- Type "OOBE\BYPASSNRO" (not case sensitive)
- The system will restart and allow you to continue without a network connection upon next boot
INSTALL DRIVERS AND WINDOWS UPDATES
Once Windows 11 is installed, make sure to run updates and install the latest drivers. Windows Update handles most things automatically, but graphics cards, chipsets, and other components may need driver installs directly from their manufacturers for best performance.
| MOTHERBOARD DRIVER INSTALL GUIDES | |||
|---|---|---|---|
| ASROCK | ASUS | MSI | GIGABYTE (drafting) |
| GRAPHICS CARD DRIVER INSTALL GUIDES | ||
|---|---|---|
| AMD | INTEL | NVIDIA |
HOW TO INSTALL WINDOWS UPDATES
- Open the Start Menu, type "update", select Check for updates
- Select Check for updates
- Install all available updates
HOW TO FIND YOUR MOTHERBOARD MANUFACTURER
- Open the Start Menu, type "msinfo" and select System Information
- In the System Information window, look to the right of BaseBoard Manufacturer -- this is your motherboard manufacturer
- Use the above linked guides on how to install drivers based on the manufacturer of motherboard in the system.
