How to update your BIOSUpdated 5 months ago
Updating your computer’s BIOS is an important maintenance step that can improve system stability, add support for new hardware, enhance performance, and fix critical bugs. In this guide, we’ll cover how to identify your motherboard model number and download latest BIOS, and how to apply the update.
WHAT YOU WILL NEED
- A USB flash drive formatted to FAT32 the USB flash drive should not exceed 32GB.
- Your motherboard model number and latest BIOS (see guide below)
- Internet access to download the latest BIOS update
IDENTIFY YOUR MOTHERBOARD MODEL AND DOWNLOAD THE LATEST BIOS
- Open the start menu
- Type, "msinfo", and open "System Information"
- To the right of "BIOS Version/Date" is the installed BIOS version
- To the right of "BaseBoard Manufacturer" is the motherboard manufacturer
- To the right of "BaseBoard Product" is the motherboard model number
- Select and copy the "BaseBoard Product" line and paste it into a Google search, most of the time the manufacturer product page for the motherboard will show in the first few results
- Go to the support and downloads section for the motherboard to find the latest BIOS update and download it
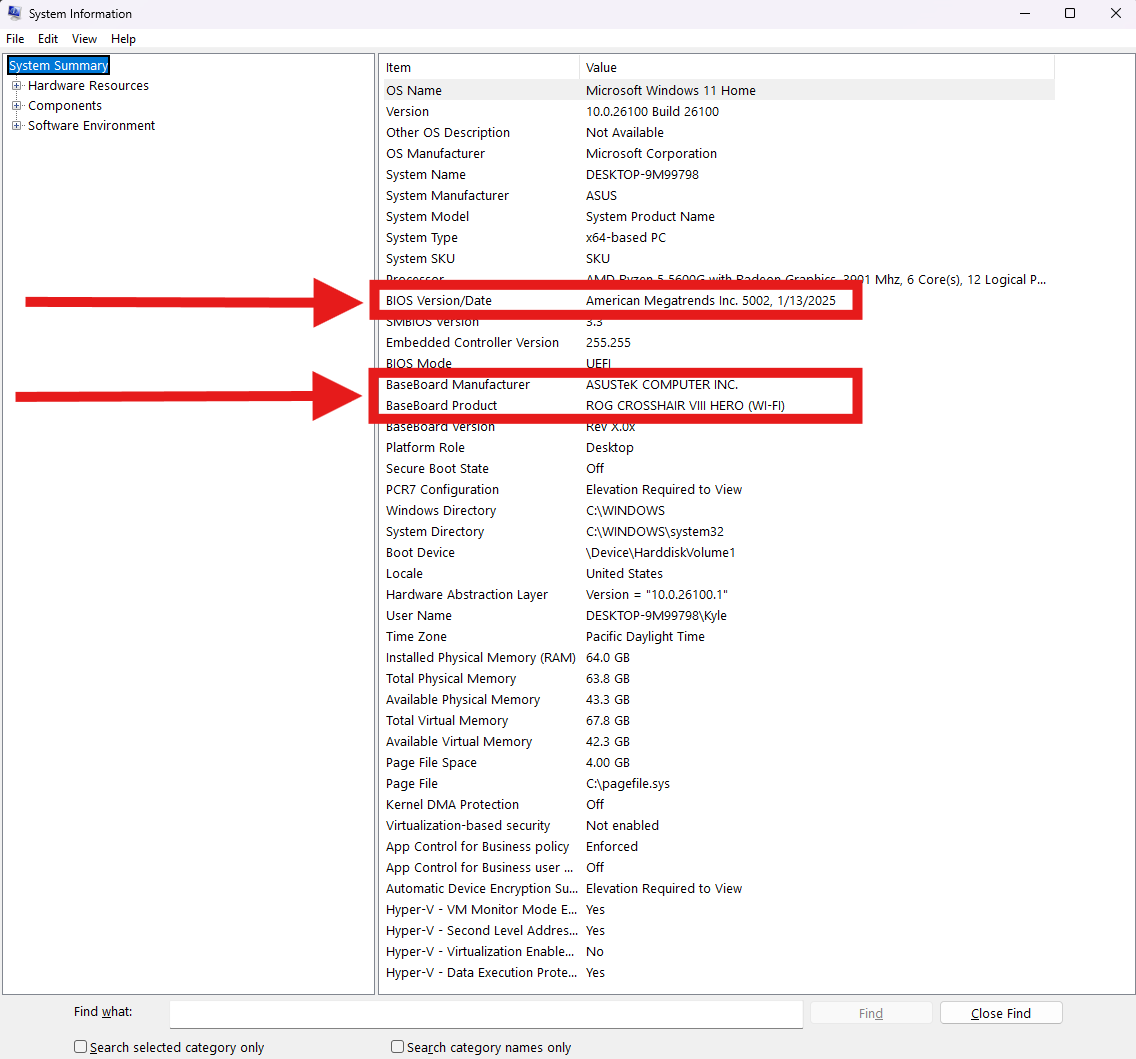 The System Information window, showing an ASUS ROG Crosshair VIII Hero WiFi motherboard
 Google search after copying and pasting the BaseBoard Product line and the first result being the product page we are seeking
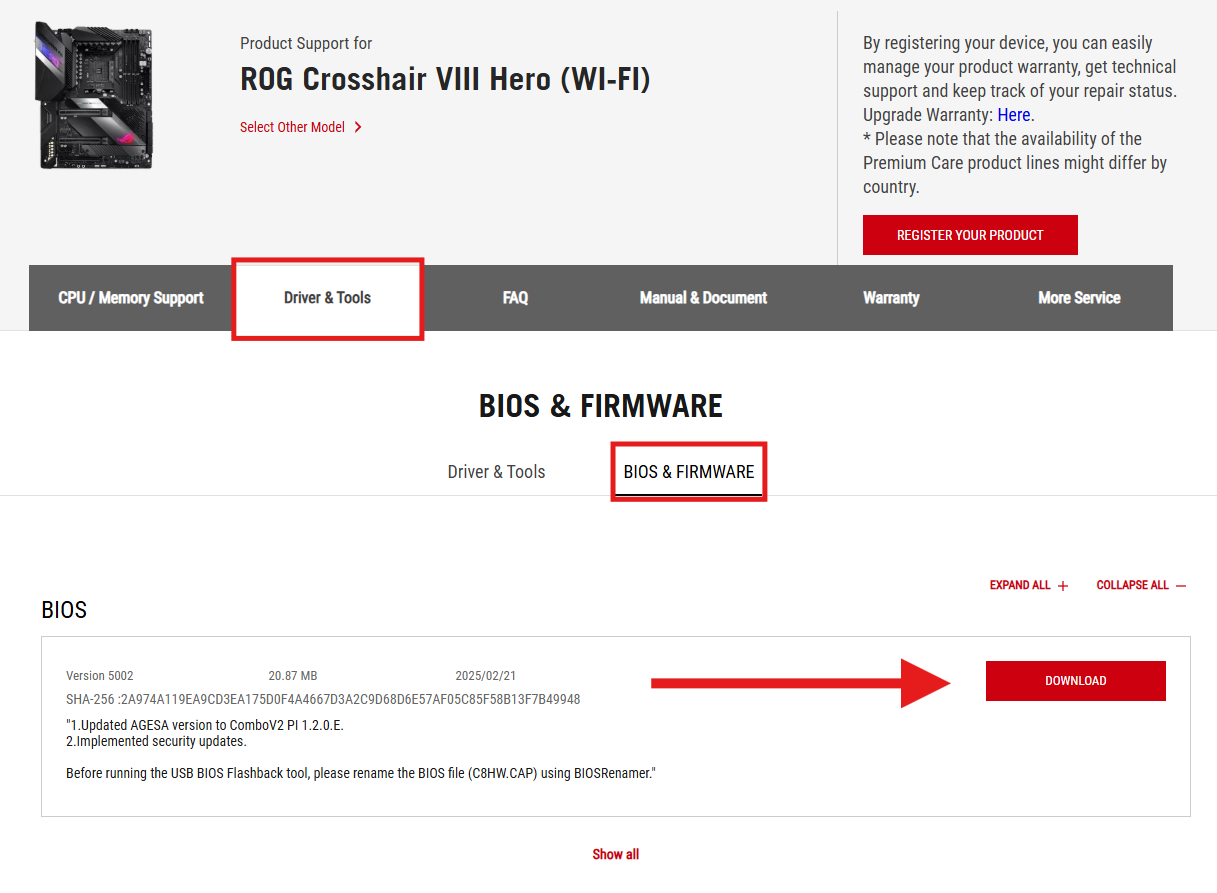 ASUS ROG Crosshair VIII Hero Wi-Fi support page with the latest BIOS available to download
While each manufacturer product support pages are different, the process is essentially the same. Find your motherboard model, go to the manufacturer's product page for it, then go to the support section and locate and download the latest BIOS.
Once you have the latest BIOS downloaded, proceed to the install guides below. The guides are separated by motherboard manufacturer -- please ensure you are following the correct guide for the manufacturer of motherboard you have.
BIOS INSTALLATION GUIDES
ASROCK
ASRock motherboards can be easily updated using their Instant Flash Utility built into the BIOS.
- Back up any BitLocker recovery keys (if applicable) before installing a BIOS update. If you do not use BitLocker, continue to the next step.
- Download the latest BIOS update file from ASRock
- Extract the folder, and copy then paste the .ROM file onto a blank flash drive
- Boot to the BIOS by pressing F2 on bootup
- Once in BIOS, select the Tools tab. If you do not see a Tools tab you may need to switch to an Advanced Mode view by enabling it at the top right
- Select the Instant Flash option, it will scan the USB drive for the update file automatically
- The utility will prompt you to make a backup of BitLocker recovery keys before continuing, you should have already done this by now, or if you don't use BitLocker, it does not apply to you
- Update the BIOS
- The system will start the BIOS update and it may show a black screen for several minutes and/or reboot several times -- DO NOT TURN THE SYSTEM OFF!
- Once the update is applied, we recommend resetting to BIOS default settings. To do this, re-enter the BIOS Setup Menu and click Exit, then choose Load Default Settings followed by Exit Saving Changes
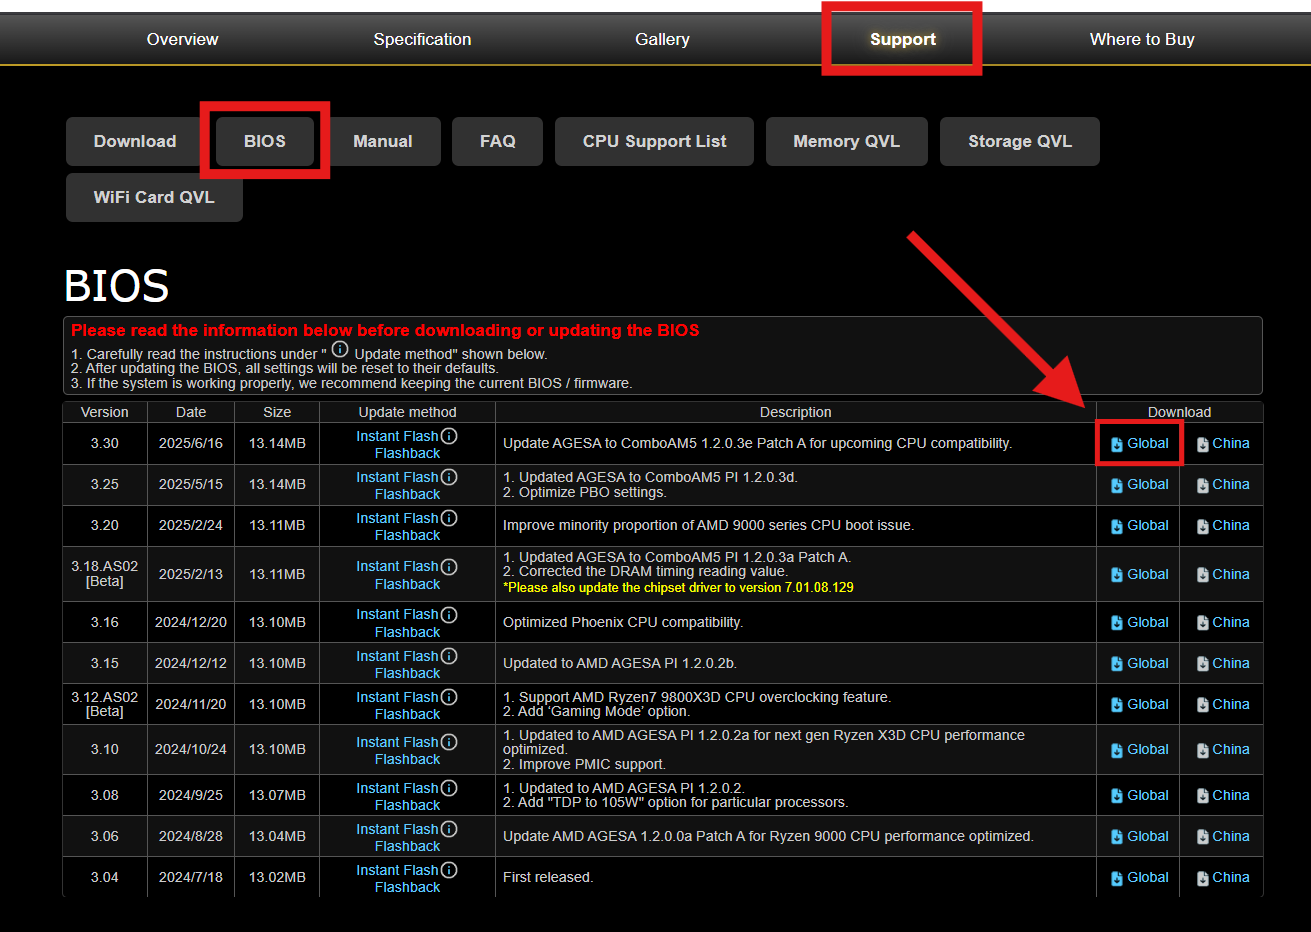 Example of the ASRock X870E Taichi BIOS download page
ASUS
The video above is a helpful guide on the general process of applying a BIOS update. However, it does not cover important additional steps. To ensure full performance of your RAM and optimal cooling we highly recommend following the steps below.
- Back up any BitLocker recovery keys (if applicable) before installing a BIOS update. If you do not use BitLocker, continue to the next step.
- Download the latest BIOS update file from ASUS
- Extract the folder, and put the .CAP file onto a blank flash drive
- Boot to the BIOS by pressing F2 on bootup
- Once in BIOS, switch to Advanced Mode by pressing F7
- Open the Tools tab
- Double click on ASUS EZ Flash Utility
- Find the USB drive that has the BIOS update file, and select the update file you put on the drive to start the update
- The utility will prompt you to make a backup of a BitLocker recovery key before continuing. You should have already done this by now, or if you don't use BitLocker, this step does not apply to you
- Start the update, and it may show a black screen for several minutes and/or reboot several times -- DO NOT TURN THE SYSTEM OFF!
- Once the update is complete, you will see a message about booting back into the BIOS and resetting the BIOS to default settings
- Go back into BIOS, and push F5 to reset to default settings
- Depending on what type of CPU cooler you have, please follow one of the two routes below:
| IF YOU HAVE AN AIO CPU COOLER | IF YOU HAVE AN AIR CPU COOLER |
|---|---|
| Ensure you are in Advanced Mode (toggle between Advanced Mode and EZ mode with F7). Go to the Monitor menu, select Fan Speed Monitor, and to the right of CPU Fan Speed, set it to Ignore | Skip this step |
- Go back to the main menu (Esc)
- Ensure you are in EZ Mode (toggle between Advanced Mode and EZ mode with F7)
- Finally, we need to set your RAM profile to run at their full speed. On the left side about center, there will be a drop-down menu set it to Enabled or Profile 1. For systems with AMD processors, this is known as DOCP or EXPO, for Intel systems it is known as XMP.
- Save these changes and exit the BIOS and you are done!
MSI
The video above is a helpful guide on the general process of applying a BIOS update. However, it does not cover an important additional step. To ensure full performance of your RAM we highly recommend following the steps below.
- Back up any BitLocker recovery keys (if applicable) before installing a BIOS update. If you do not use BitLocker, continue to the next step
- Download the latest BIOS update file from MSI
- Extract the folder, and put the update file onto a blank flash drive; it is recommended to save the BIOS file to the root folder for easier access
- Reboot the system, and tap on the Del key on your keyboard during startup to enter the BIOS
- Once you are in the BIOS, use the M-FLASH tool to install the update (follow the steps in the video)
- DO NOT TURN THE SYSTEM OFF UNTIL THE UPDATE IS COMPLETE!
- Boot into the BIOS by tapping Del key during bootup
- Once in BIOS, on the left side towards the top, enable Profile 1
- Select the X at the top right to exit the BIOS, then select Save Changes and Exit
GIGABYTE
- Back up any BitLocker recovery keys (if applicable) before installing a BIOS update. If you do not use BitLocker, continue to the next step
- Download the latest BIOS update file from Gigabyte
- Extract the folder, and put the update folder onto a blank flash drive. Please ensure to maintain the original folder with all files within it, as removing the BIOS file itself may result in a failed verification.
- Reboot the system, and tap on the Del key on your keyboard during startup to enter the BIOS
- Once you are in the BIOS, press F8 to enter the Q-FLASH menu
- Within the Q-FLASH menu, navigate to the storage devices in the bottom left and select the USB containing your BIOS update.
- On the left side of the table, select the folder containing your BIOS update file
- Once selected, please double-click on the file on the right hand side of your table
- After properly selecting the file you want to flash onto your motherboard, please approve of the pop-up message to initiate the BIOS update process.
- DO NOT TURN THE SYSTEM OFF UNTIL THE UPDATE IS COMPLETE!
- Boot into the BIOS by tapping Del key during bootup
- Once inside of BIOS, navigate to the lower left-hand portion and located your XMP Setting. Set this to XMP-1. After doing so, press F10 and Enter to save and exit