How to clean and maintain your META PCUpdated 5 months ago

Keeping your META PC clean is a crucial part of maintaining optimal performance and reliability. Over time, dust builds up inside your system, trapping heat and reducing airflow. A quick, careful cleaning can help restore cooling efficiency, extend the life of your components, and keep your system running smoothly.
This guide walks you through the process step-by-step — from safely opening your case and removing the graphics card, to blowing out dust, reapplying thermal paste, and verifying all connections before powering back on.
⚠️Warning: Cleaning or maintaining your PC involves handling sensitive components. META PC is not responsible for any damage, data loss, or performance issues resulting from improper handling, misuse, or accidental damage during maintenance.
Follow this guide carefully and at your own risk. If you are unsure or uncomfortable with any step, we recommend contacting META PC Support or visiting one of our locations for professional assistance.
WHAT YOU NEED
- Electric air blower
- Soft brush
- Microfiber cloths
- Phillips #2 screwdriver
- 99% isopropyl alcohol (at least 90%)
- Shop towels (much better than paper towels)
- Quality thermal paste
- A bowl or tray to hold screws
- Flashlight or headlamp
💡Tip: Use your phone to follow this guide, and take photos of the system before cleaning to ensure that everything is plugged in where it was before
SAFTEY FIRST
- Ensure your PC is fully powered down and unplugged from power
- Push and hold the case power button for 10 seconds to discharge residual electricity stored in the motherboard capacitors
- Work on a large, solid surface, such as a workbench or countertop; occasionally, touch the bare metal on the case to stay grounded.
- Do not work on the carpet
- Hold fan blades still while blowing air so the bearing and or fan blades do not break
- Never use a vacuum inside the PC as it can produce static electricity that can damage internal components.
- Avoid canned/compressed air, as it can spray propellant and moisture
OPEN THE CASE
Every PC case has typical ways to open, regardless of brand. Below we will cover the most common ways, however if you get stuck or have any questions please reach out to our support team, we are happy to help.
⚠️Warning: Tempered glass is fragile and should be handled with extreme caution and care. Always place glass on a soft surface, like a blanket or towel to prevent scratches or cracks.
| REAR SIDE PANEL SCREWS | SNAP / BALL MOUNT POSTS |
|---|---|
 Unscrew then gently slide or swing panel |  Gently pull outward until the panel releases |
 Unscrew then gently lift panel away |  Pull the panel using the tab Pull the panel using the tab |
| ON PANEL SCREWS | MAGNETIC / PULL TAB |
REMOVE THE GRAPHICS CARD
The video above is a video tutorial on how to remove and reinstall your graphics card. Please note that the video walkthrough may differ slightly, as you may have a different case, a different graphics card size, or different power connections to the graphics card; however, the same principles apply.
With the power unplugged, press the case power button once to discharge.
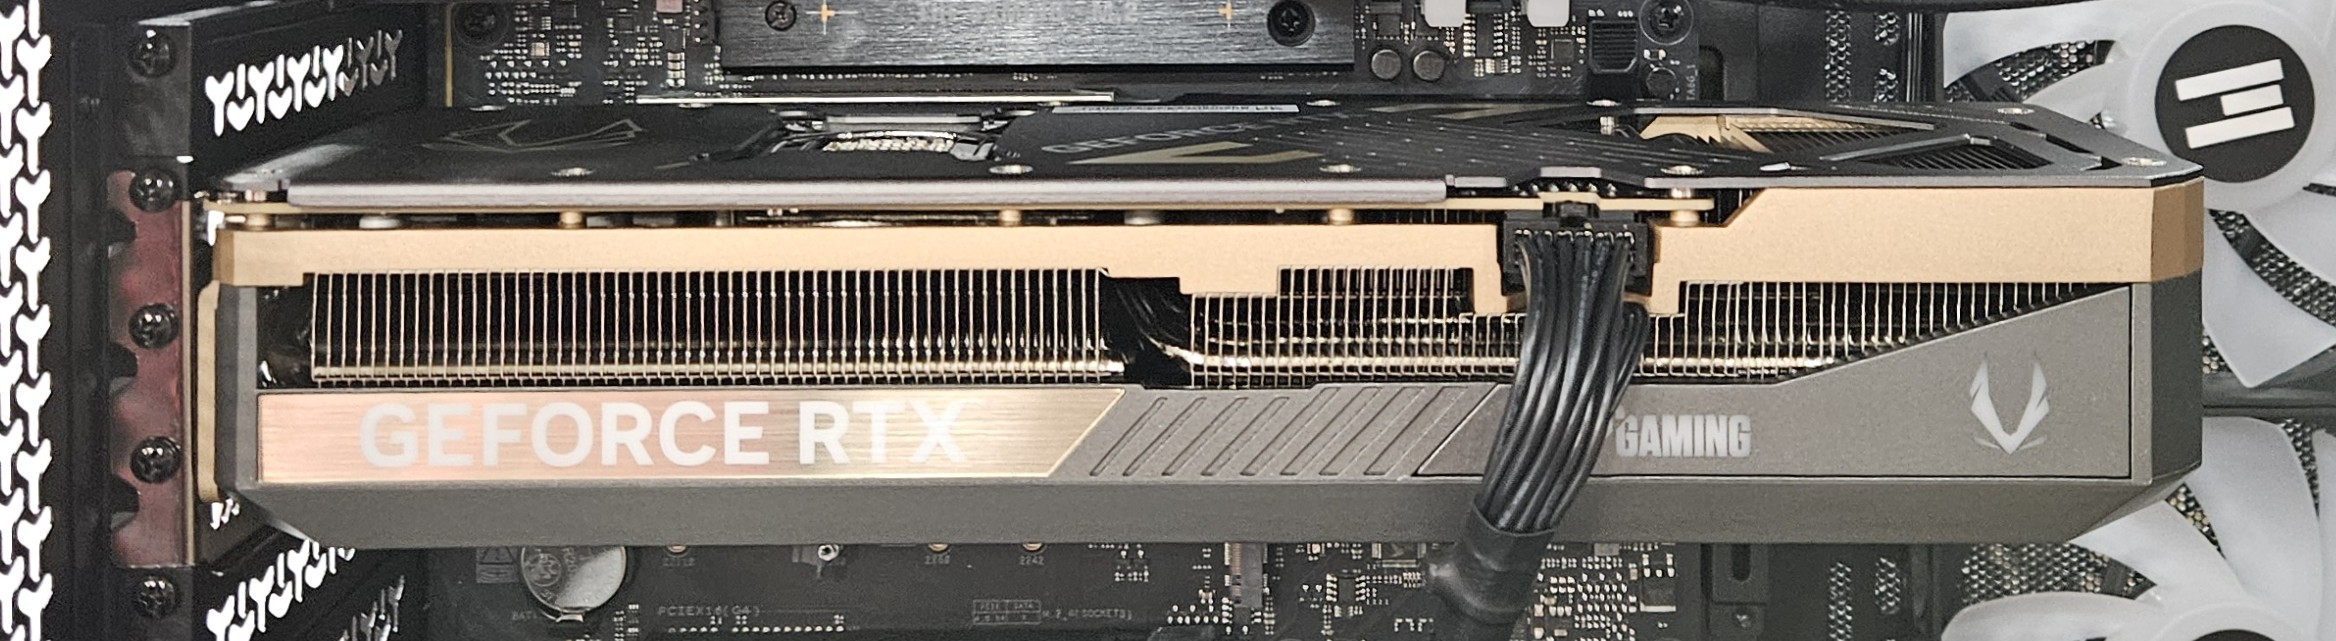
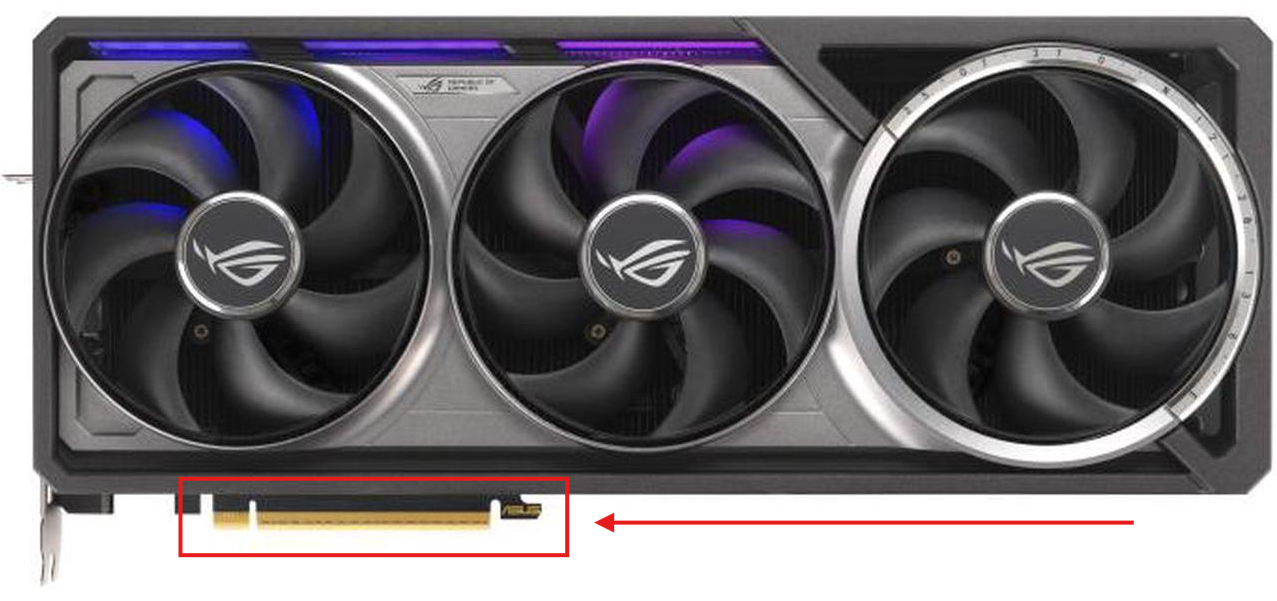
- Locate the graphics card. It is the large component connected to a PCIe slot on the motherboard (see examples below)
- Disconnect any power cables. Please note that graphics card power cables have locking mechanisms that will need to be pressed to unlock before disconnecting
- Unscrew the card from the case. Depending on the size of your graphics card, you may need to remove 1 to 4 screws.
- Locate and press the release mechanism. Some motherboards have a PCIe slot release latch, while newer or high-end models may have buttons or latches on the right side instead.
- Remove the card from the PCIe slot. Pull the graphics card straight out to ensure it is removed safely

BLOW OUT THE SYSTEM
- Move your system to a safe and stable location outside
- Set your electric blower to a moderate setting. Start with short bursts to see how dust moves.
- Hold every fan still with a finger or a cotton swab, then blow through the heatsink (radiators, CPU cooler, case fans) from the opposite side of normal airflow to push dust out.
- Work top‑to‑bottom and inside‑to‑outside: CPU area → VRM heatsinks → RAM → motherboard → case fans → radiators → PSU shroud → front/bottom intakes.
- Remove case dust filters and blow from the clean side out through the dirty side. If stubborn, rinse with water and dry thoroughly before reinstalling.
- Use a soft brush to loosen caked dust on heatsink fins, then blow again.
- You can also use a microfiber cloth to remove excess dust from hard-to-reach cracks and crevices.
⚠️Caution: Canned compressed air can spray propellant and moisture that may cause damage to internal components. Because of this, we recommend using electric blowers.
CLEAN THE GPU
- Place the graphics card on a clean surface, with the fans facing up
- Hold each fan and blow dust through the heatsink fins from the back/edge toward the fan side
- Use a soft brush on the shroud edges and the backplate, and avoid touching the PCB
- Inspect the golden fingers and power socket: no debris, no bent pins, no melted plastic.
 PCIe "golden fingers"
⚠️Warning: Do NOT use any liquids to clean the graphics card!
RE-APPLY THERMAL PASTE ON THE CPU
STEP ONE: REMOVE YOUR COOLER
- Power the system down, unplug the power cable from the system's power supply, then push and hold the power button for 5 seconds to drain any leftover power stored in the capacitors
- Place your PC on its backside so the internal components are facing upwards
- Make note of any fan or pump connections from your cooler to the motherboard, as these may need to be unplugged to shift the cooler to the side or, in some cases, remove the cooler from your case entirely
- Remove the mounting screws in a cross pattern, then gently lift your CPU cooler away from the system and set it to the side
- With some coolers, you can leave the cables connected to the motherboard and gently set the AIO or heatsink to the side, providing enough room to complete the cleaning tasks

STEP TWO: CLEAN THE CPU AND COLD PLATE
- Clean the CPU's heat‑spreader (IHS) and the cold plate with an isopropyl alcohol dampend microfiber towel
- Once all thermal paste is removed, allow the IHS and cold plate to dry
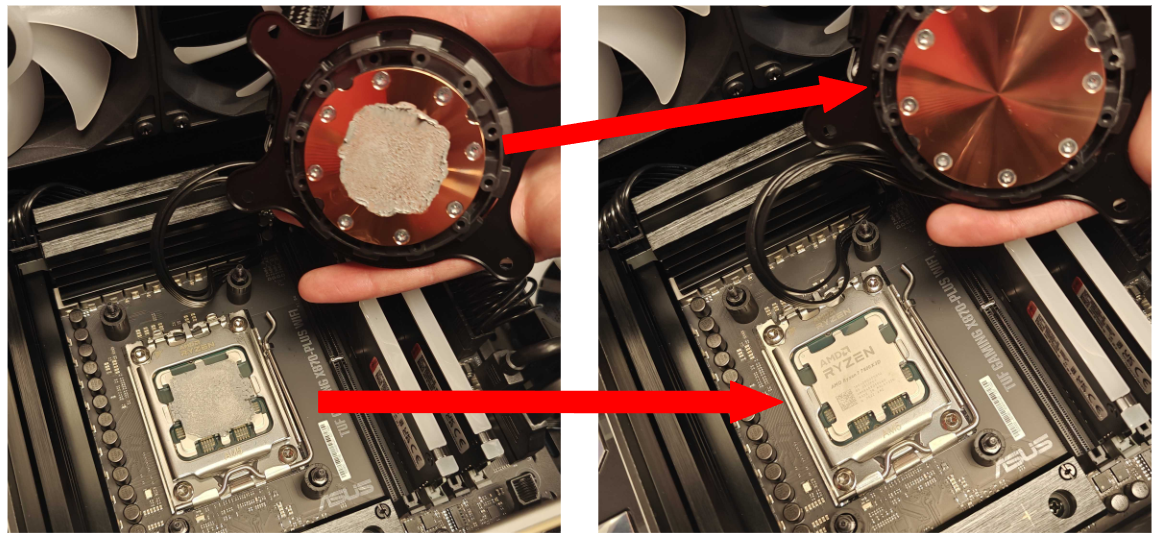 Before and after cleaning old thermal paste on CPU and the AIO cold plate
STEP THREE: APPLY FRESH THERMAL PASTE
- Apply fresh thermal paste using the recommended guide below
AMD AM4 + AM5 | INTEL 1700 + 1851 |
|---|---|
 | 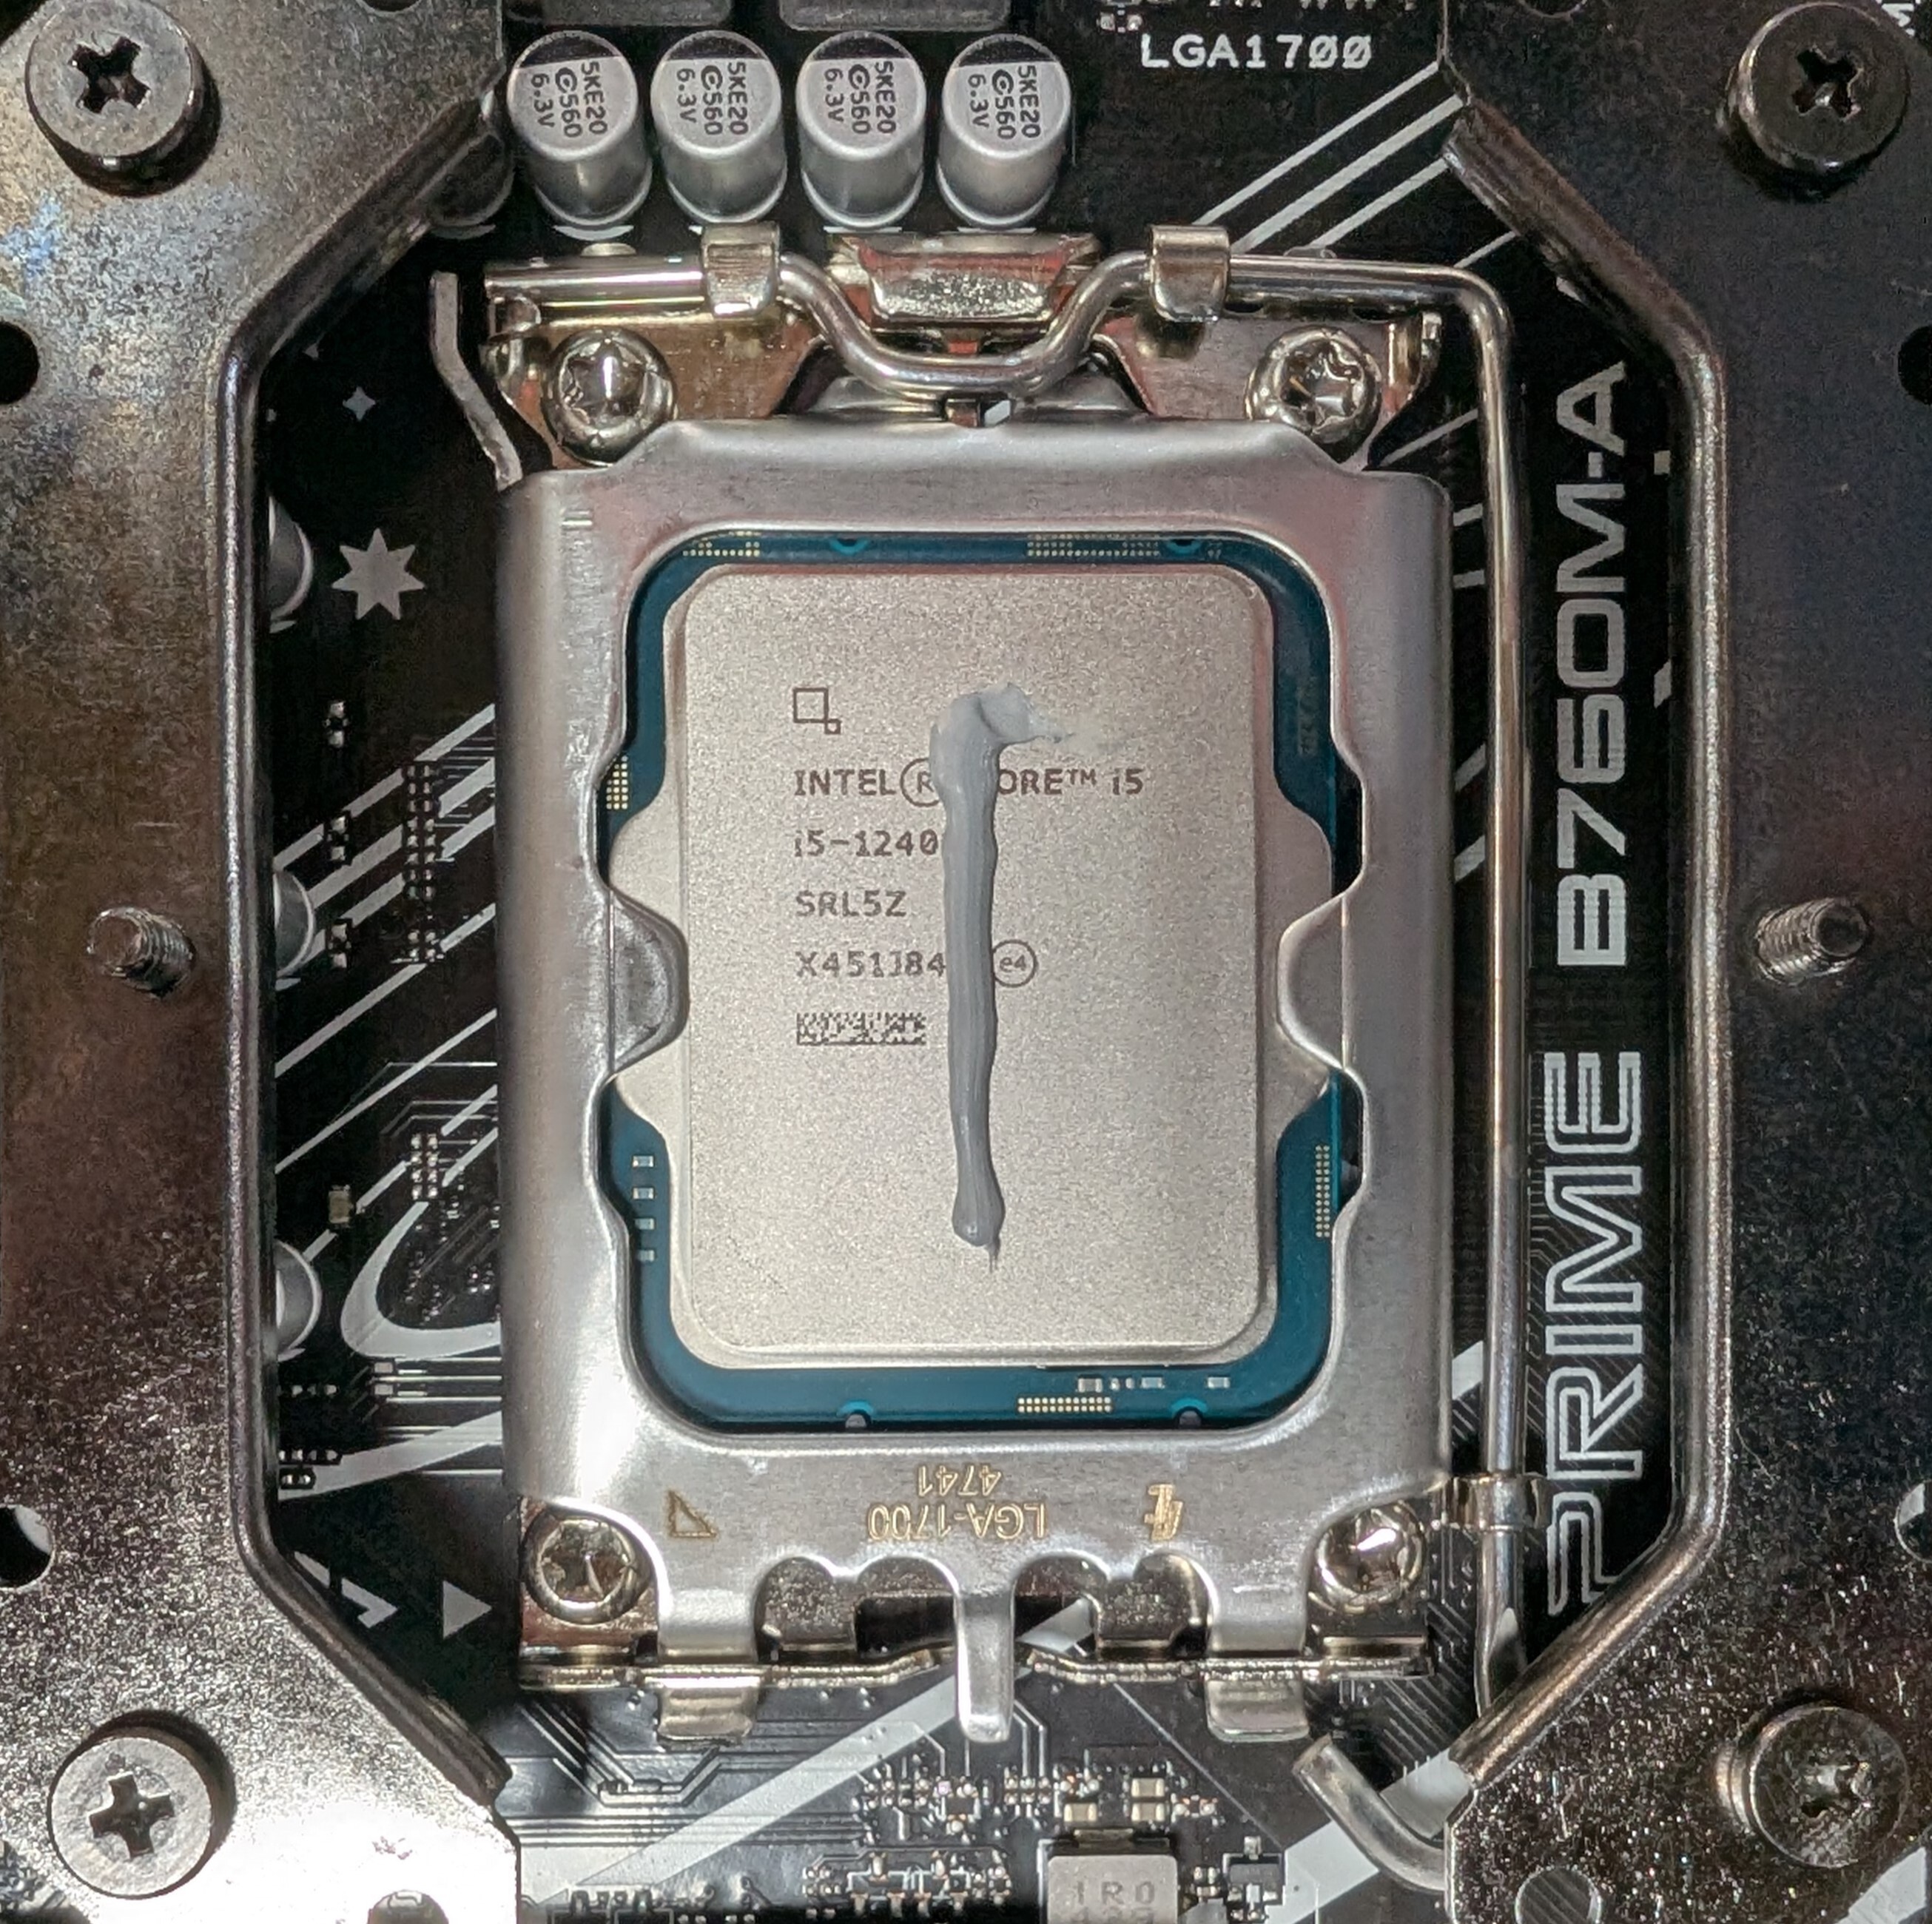 |
AMD AM4 + AM5 CPUs are more square, and roughly a pea-sized dot of thermal paste will spread enough to cover the entire IHS | Intel 1700 + 1851 CPUs are rectangular, so a straight line down the middle should spread enough to cover the entire IHS |
STEP FOUR: REINSTALL THE COOLER
- Reinstall the cooler by tightening it in the same cross pattern until snug. We recommend hand-tightening to ensure the screws do not strip.
- Verify that all cable connections from fans or pumps noted in step one are firmly connected to the motherboard
REINSTALL THE GRAPHICS CARD
Quick reseat sweep
- 24‑pin ATX and 8‑pin CPU power cables are fully latched
- RAM modules are firmly seated from top to bottom
- Front‑panel I/O plug secure
- AIO pump/fans or CPU_FAN connected
- Any SATA or accessory power reattached
REINSTALL THE PANELS
- Replace the front panel (snap posts or screws)
- Replace the side glass by aligning the rear notches or posts, then securing the screws or snaps
- Replace the top panel by sliding or dropping it into place
POWER ON CHECKLIST
- Plug in the power and switch the PSU to the 'I' (on) position
- First boot may spin fans briefly at high speed, and if you are using an AMD CPU, it may take longer to boot than normal
- Verify your monitors are connected to the GPU (not the motherboard) and you have a display.
- Optional: Enter BIOS/UEFI (Del/F2) to check CPU temps at idle
HELPFUL LINKS
FAQ
HOW OFTEN SHOULD I BLOW OUT MY SYSTEM?
Around every 3-6 months for most homes (more often if you have pets, smoke, or live in a dusty area).
HOW OFTEN SHOULD I REAPPLY THERMAL PASTE ON MY CPU?
For most systems, thermal paste only needs to be replaced every 2 to 3 years — or sooner if:
- You’ve removed or replaced the CPU cooler
- You notice higher-than-normal CPU temperatures
- The system has been exposed to very high ambient heat or dust buildup for long periods
When reapplying, always clean off old paste thoroughly with isopropyl alcohol (at least 90%) and use a high-quality thermal paste.
CAN I USE CANNED AIR IF I DON'T HAVE AN ELECTRIC DUSTER?
We recommend an electric air duster, if possible. However, canned air is acceptable if you are careful to hold the canister ~1.5 feet away from the machine during usage and ensure that no residual moisture remains on your PC.
WHAT CAN I DO TO KEEP MY PC CLEANER FOR LONGER?
Elevating the system from the ground and performing more frequent air dusting.