MSI BIOS Flashback GuideUpdated 8 months ago
MSI motherboards with BIOS Flashback let you update the BIOS using only a power supply and a USB drive — no CPU, RAM, or GPU required. This is especially helpful if your system won’t boot with a new processor or if you need to recover from a corrupted BIOS.
Follow the steps below carefully to ensure a smooth update
⚠️Note: TPM will be reset after performing BIOS Flashback. Please suspend Bitlocker and any encryption or security feature that rely on TPM before proceeding
⚠️ Important: Using an incorrect BIOS file or interrupting power during the update can cause damage to your motherboard. Always double-check your exact motherboard manufacturer model and follow the steps carefully
VIDEO GUIDE
WRITTEN GUIDE
STEP ONE: DOWNLOAD AND PREPARE THE BIOS FILE
- Go to the MSI Support Website
- Enter your exact motherboard model and navigate to support on the motherboard website, then go to Drivers and Downloads and then select the BIOS tab
- Download the latest BIOS version for your exact motherboard
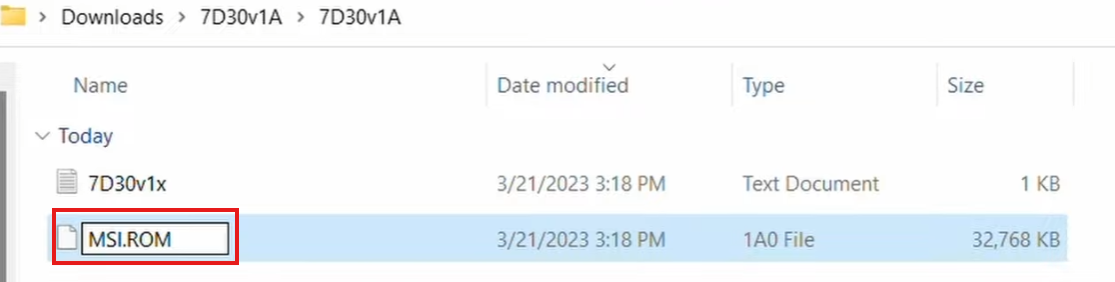
- Extract the ZIP folder -- inside you will find the BIOS file
- Right click on the BIOS file and rename it to "MSI.ROM" in all caps
STEP TWO: PREPARE THE USB FLASH DRIVE
- Insert a USB flash drive into a working PC
- Check to see if the drive is already formatted in FAT32, right click USB drive and click properties, you will see file type
- If required, format the drive to FAT32 -- right-click on the drive > Format > choose FAT32)
- Copy the renamed BIOS file directly onto the USB drives root directory (not inside any folders)
⚠️Warning: formatting a flash drive will delete all data on the drive
STEP THREE: CONNECT THE USB DRIVE TO THE MOTHERBOARD
- Locate the dedicated BIOS Flashback USB port on the rear I/O of your MSI motherboard (this port is usually labeled “BIOS” or has a small outline around it)
- Insert the USB flash drive into this specific port

STEP FOUR: START THE BIOS FLASHBACK PROCESS
- Find the BIOS Flashback button on the rear I/O panel
- Press the Flash BIOS Button; an indicator light will flash frequently
- Most BIOS Flashbacks will take between 5-10 minutes to complete
- DO NOT REMOVE THE USB DRIVE OR POWER OFF THE SYSTEM DURING THE UPDATE
💡Tip: If the LED light turns off quickly, this means that the BIOS Flashback is not operating properly. Please make sure that you plug the USB drive to the USB BIOS Flashback port and that you have downloaded the correct BIOS file, and it was properly renamed.
STEP FIVE: COMPLETE THE UPDATE
- When the LED stops blinking and turns off, the update is complete
- Remove the USB drive
- Power on your system normally
- After updating the BIOS, please allow additional boot time for your RAM timings to be configured. This is a normal, one-time process that only occurs after a BIOS update or BIOS reset.
STEP SIX: AFTER UPDATE SETTINGS
Depending on what type of CPU cooler you have, please follow one of the two routes below:
- Boot to the BIOS by tapping F2 on bootup
- Ensure you are in EZ Mode (toggle between Advanced Mode and EZ mode with F7)
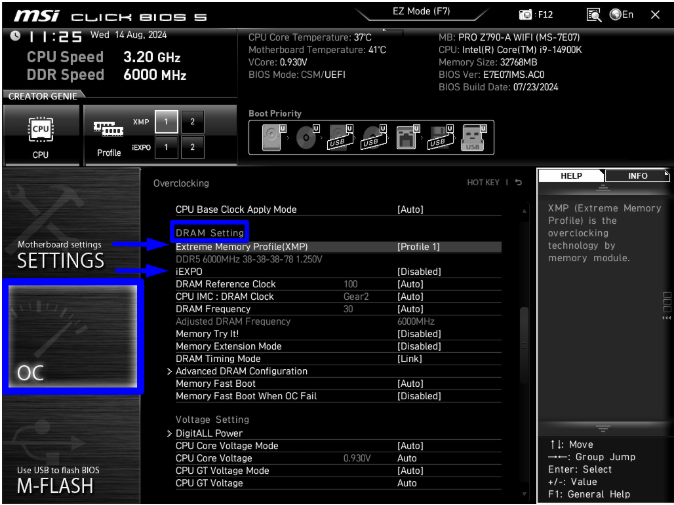
- Select OC on the left side of the screen. Scroll down until you locate DRAM Setting
- Finally, we need to set your RAM profile to run at their full speed. Set it to Enabled or Profile 1. For systems with AMD processors, this is known as DOCP or EXPO, for Intel systems it is known as XMP.
- Save these changes and exit the BIOS and you are done!
TROUBLESHOOTING
- LED does not blink: check that the file was renamed correctly and the USB is formatted to FAT32
- LED blinks quickly and then stops: wrong BIOS file or incorrect renaming
- Update seems stuck: some updates take 5–10 minutes; wait until the LED stops blinking